Master Windows Snap Assist for Efficient Multitasking: Essential Tips and Shortcuts
Windows Snap Assist is a built-in window management feature that organizes open applications into split-screen layouts to speed up multitasking and reduce visual clutter. In this guide you will learn what Snap Assist does, how it differs between Windows 10 and Windows 11, practical mouse and keyboard techniques, and quick troubleshooting steps for common issues. The article explains Snap Layouts, Snap Groups, and keyboard shortcuts like and so you can snap windows across single or multiple monitors with fewer context switches. Pain points such as overlapping windows, lost app layouts, and slow workflows are addressed with step-by-step actions and short cheat-sheets designed for a multitask PC user. Finally, you’ll find compact troubleshooting guidance and optional professional support options to optimize Snap Assist behavior and system responsiveness.
What is Windows Snap Assist and How Does It Improve Multitasking?
Windows Snap Assist is a window management tool that automatically suggests and arranges open windows into tiled or split views, improving productivity by minimizing manual resizing and placement. It works by detecting when you drag a window to screen edges or use keyboard shortcuts, then offering snap targets so you can build focused workspaces quickly. Benefits include faster context switching, clearer task grouping, and simpler multi-window research or meeting layouts. Understanding these fundamentals leads naturally to comparing how Snap Assist behaves in Windows 10 versus Windows 11 and why Snap Layouts and Snap Groups matter for persistent workflows.
Snap Assist offers three main productivity benefits:
- Faster Window Organization: Quickly arrange apps into split screens without manual resizing.
- Reduced Context Switching: Group related tasks to keep workflows focused and visible.
- Consistent Layouts: Restore common arrangements to save time when returning to work.
These advantages explain why learning shortcuts and layouts is the next logical step.
Understanding Snap Assist Features in Windows 10 and 11
Windows 10 uses a basic Snap Assist that suggests nearby open windows when you snap one app to the edge, making it easy to fill the remaining space. Windows 11 expands this with Snap Layouts—contextual presets accessed from the maximize button or —and Snap Groups that remember combinations of snapped apps in the taskbar. For example, research with a browser and notes app is straightforward in Windows 10, while Windows 11 lets you pick a three-pane layout and later restore that group with a single click. The evolution from simple edge snapping to layout presets reduces friction for complex multitasking setups.
These OS differences matter when choosing shortcuts and will inform how you access layouts and groups on your device.
How Snap Assist Enhances Productivity and Window Organization
Snap Assist reduces the time spent arranging windows so you can focus on tasks like writing, coding, or comparing documents, which increases throughput and lowers cognitive switching cost. For content creators, snapping a reference window, editor, and preview into a three-column layout keeps all necessary context visible at once. For meetings, snapping the video call to one side and notes to another prevents accidental overlap and maintains attention on the presenter. Quantitatively, fewer manual adjustments translate to measurable time savings across workflows.
This practical improvement in workflow organization naturally leads to the specific mouse and keyboard techniques used to implement Snap Assist effectively.
How Do You Use Snap Assist and Keyboard Shortcuts Effectively?
Snap Assist combines simple mouse gestures with a handful of keyboard shortcuts to enable fast split screen windows and precise placement for a multitask PC environment. Use drag-to-edge or keys for direct snapping, or on Windows 11 to open Snap Layouts. These core methods let you build 2-, 3-, or 4-window arrangements and move windows between monitors without resizing each window manually. Mastering these actions and a short cheat-sheet will make daily multitasking smoother and faster.
Here’s a quick cheat-sheet of common snapping actions and shortcuts:
| Action | Shortcut | Result |
|---|---|---|
| Snap left/right | Win + Left / Win + Right | Pins window to left or right half of screen |
| Access Snap Layouts (Win 11) | Win + Z | Opens layout presets from maximize button |
| Move window between monitors | Win + Shift + Left/Right | Transfers window to adjacent monitor without resizing |
Step-by-Step Guide to Snapping Windows with Mouse and Keyboard
To snap with the mouse, drag a window to the left or right edge until you see a translucent snap outline, then release to occupy that region. Using the keyboard, press or to move a window to halves, and press to tile into quadrants or restore. On Windows 11, hover over the maximize button to reveal Snap Layouts or press to pick a preset. Practice restoring snapped windows by switching to another task and reselecting the taskbar group to bring the layout back into focus.
Learning these steps prepares you to combine shortcuts and layouts for complex multi-window workflows.
What Are the Most Useful Snap Assist Keyboard Shortcuts?
Memorizing a small set of keyboard shortcuts dramatically improves speed when arranging windows, especially for users who prefer keyboard-driven workflows. The top three essentials are for immediate snapping, to open Snap Layouts on Windows 11, and to move apps across multiple monitors. Additional combinations like help with maximizing and restoring snapped windows. Practicing these in real tasks turns them into reflexes that save time each day.
For quick reference, here are additional helpful shortcuts:
- Win + D to show desktop when you need a temporary clear workspace.
- Alt + Tab to switch between snapped windows efficiently.
- Win + Tab to manage virtual desktops alongside Snap Assist.
What Are Windows 11 Snap Layouts and Snap Groups?
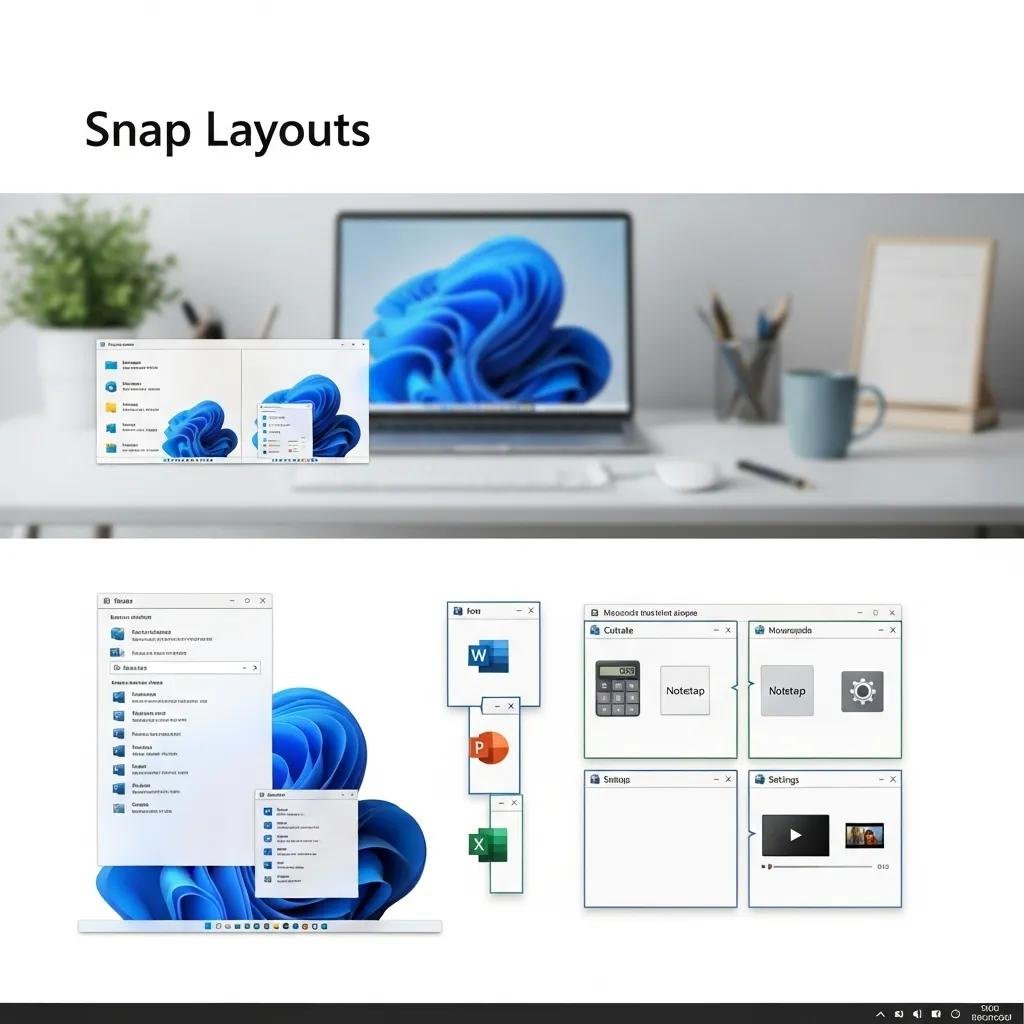
Snap Layouts are a Windows 11 feature that offers visual layout presets—two, three, and four-pane arrangements—so you can choose an optimal split for your task without manual sizing. Snap Groups record the combination of apps in a layout and surface them on the taskbar so you can restore an entire configuration after switching contexts. These mechanisms make it easier to maintain consistent multi-app sessions across workdays and are particularly helpful for users who regularly multitask with the same app set. Understanding layout types and when to use them helps you create predictable, repeatable workspaces.
Below is a compact comparison of common layout types and their best use cases.
| Layout Type | Window Count / Arrangement | Best Use Case |
|---|---|---|
| Side-by-side | 2 windows (50/50) | Writing while referencing a source |
| Three-column | 3 windows (left, center, right) | Research, notes, and communication apps |
| Quadrant | 4 windows (2×2 grid) | Monitoring dashboards and developer tools |
How to Access and Choose Snap Layouts for Efficient Window Management
To open Snap Layouts, hover over the maximize button on a window or press ; then click the pane where the current app should go and select remaining apps for other panes. For writing and research, try the two-column layout; for coding with documentation and a terminal, use a three-column or quadrant layout. If you frequently switch tasks, save common groups in Snap Groups so the taskbar shows a single entry that restores the entire set. These access methods enable rapid layout selection without interrupting your workflow.
Selecting an appropriate layout leads into understanding how Snap Groups preserve and restore those arrangements for session persistence.
How Do Snap Groups Save and Restore Window Configurations?
After you assemble a multi-window layout, Snap Groups appear as a combined icon on the taskbar when you hover over one of the apps in the group, allowing you to reopen the full arrangement with a single click. If you switch to another app or virtual desktop, returning to the taskbar group restores the previously snapped windows together, reducing the need to rebuild layouts manually. Note that if an app in the group is closed, the group cannot fully restore that window and may require manual re-launch. This behavior makes Snap Groups effective for session persistence, provided you keep the group apps open.
Knowing this recovery behavior guides when to rely on Snap Groups versus recreating layouts manually.
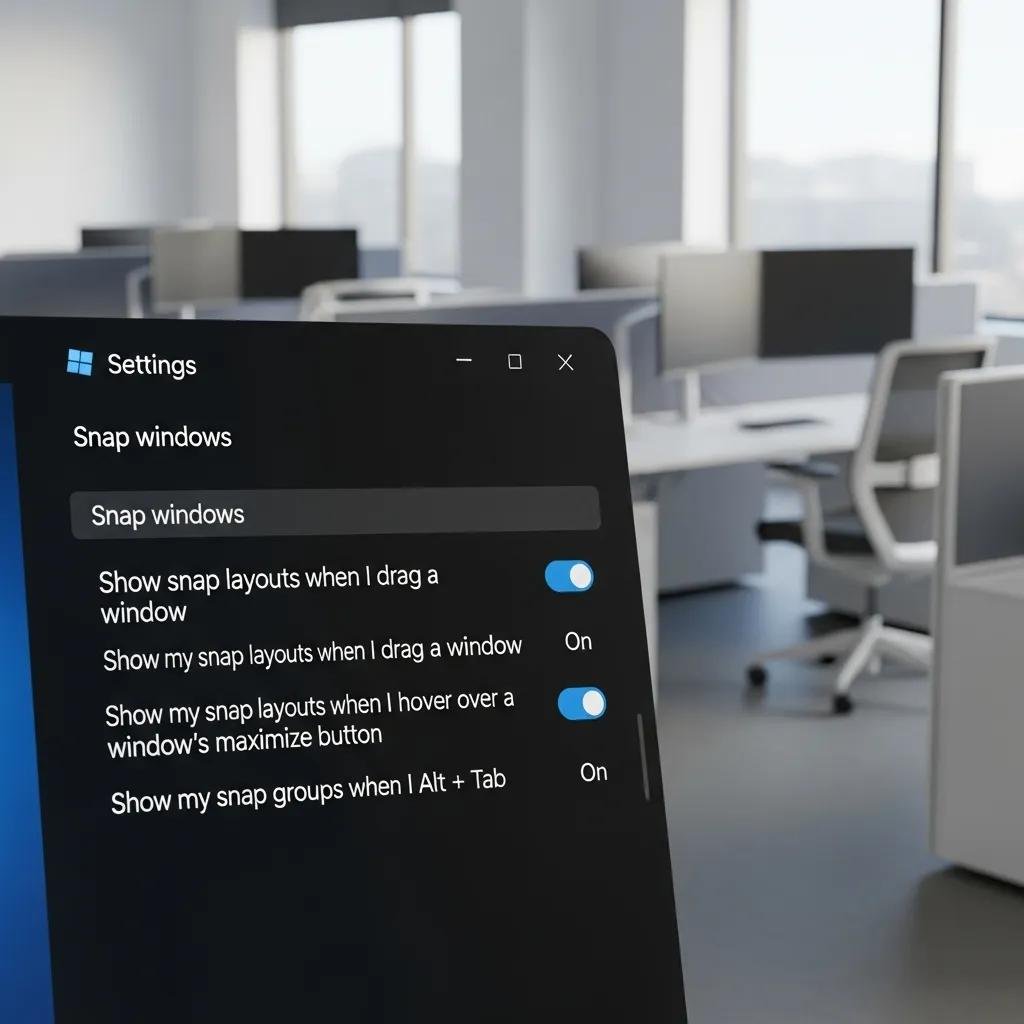
How Can You Troubleshoot and Customize Snap Assist for Better Performance?
Snap Assist settings live in Settings > System > Multitasking where you can enable or disable Snap windows and tweak sub-options like whether to show suggested snapped windows. If Snap isn’t working, common fixes include toggling the Snap switch off and on, restarting Windows Explorer, updating display drivers, and checking multi-monitor scaling options. Customization for multi-monitor setups and docking behavior helps ensure consistent snapping across screens. These steps address most issues and prepare you to escalate if necessary.
Common problems and concise fixes are listed below:
- Snap Assist not responding: Toggle Snap windows off and on in Settings and test snapping again.
- Incorrect monitor placement: Verify display arrangement and scaling under Display settings.
- Snapping misbehaves after driver update: Roll back or update graphics drivers and restart Explorer.
If these steps don’t resolve the issue, consider professional remote support: mcHelper.com provides remote computer repair and tech support for Mac and Windows users, including computer optimization and a “Speed-Up and Optimize your Computer” service that can help tune Snap Assist behavior and overall system responsiveness. This optional assistance is useful when hardware or driver issues prevent normal snapping.
How to Enable or Disable Snap Assist in Windows Settings
To toggle Snap, open Settings, go to System, choose Multitasking, and switch on or off the Snap windows option; expand its sub-options to enable suggestions and docking behaviors. On Windows 11, you can also control Snap Layout hints and Snap Group visibility from the same pane. Disabling suggestions can reduce interruptions when you prefer manual sizing, while enabling all options maximizes automated assistance. Changing these toggles is the first step in resolving unexpected snapping behavior.
Adjusting these settings directly impacts how Snap Assist suggests windows and forms the basis for further troubleshooting steps.
What Are Common Snap Assist Issues and How to Fix Them?
Frequent symptoms include Snap Assist not showing suggestions, windows refusing to tile, and inconsistent behavior across monitors; fixes begin with simple resets and progress to driver and OS updates. Restart Windows Explorer to refresh the shell, ensure your graphics drivers are current, check multi-monitor arrangements and scaling, and verify that Snap windows is enabled in Settings. If the problem persists after these actions, a remote optimization session can identify deeper causes like conflicting third-party window managers or driver incompatibilities. Knowing when to escalate to professional help prevents wasted time and restores reliable multitasking.
If needed, mcHelper.com offers 24/7 remote support with a “no fix – no fee” promise and services including virus removal, data recovery, and general technical assistance to resolve persistent system or configuration issues.
For further fine-tuning, consider experimenting with third-party tools such as PowerToys FancyZones for custom layouts when native Snap Assist does not meet advanced needs.